How to Install Lightroom Presets
Lightroom presets are a wondrous thing that will take your photography to the next level. Talk about a major timesaver.
Imagine making dozens of adjustments with just the literal click of a button.
Actually getting them to the right places so they’re usable can be a little tricky. Once you’ve obtained the presets, you may be wondering how to add the presets to Lightroom so you can use them.
Today, you’ll learn step-by-step how to add presets in Lightroom, no matter what version you have, including Lightroom Mobile.
Which Version of Adobe Lightroom are you using?
Before you can install your presets, you need to know which version of Adobe Lightroom you’re using.
If you’re not sure, you can click on the “Help” menu on your dashboard
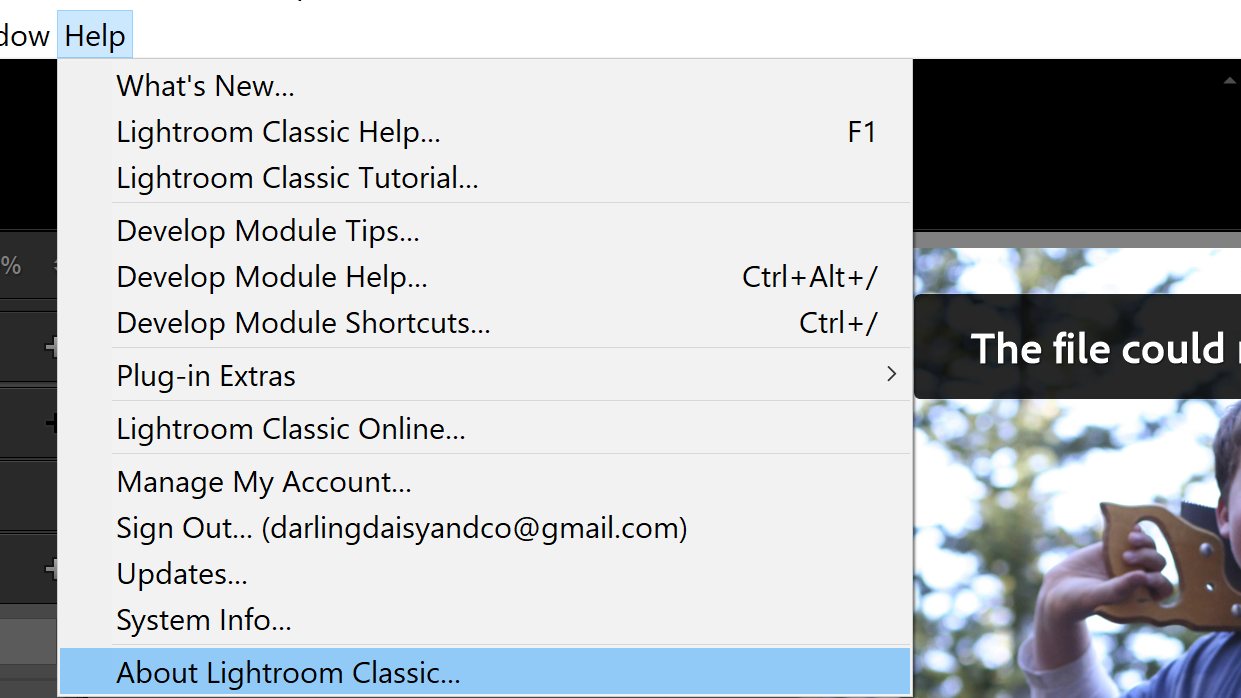
and then choose “System Info”.

Once you have this information, scroll down to the method that will work with your version.
Alright, let’s learn how to import presets into Lightroom.
How do I Install Lightroom Presets on my Computer?
Lightroom CC (desktop) and Lightroom Classic 7.3 or above
If you are using Lightroom CC Desktop Version or Lightroom Classic Version 7.3 or above, the instructions for adding presets to Lightroom are basically the same.
The first step will be downloading your preset files. They usually come in a compressed (zipped file). Unzip the file and save them on your computer. Open Adobe Lightroom.
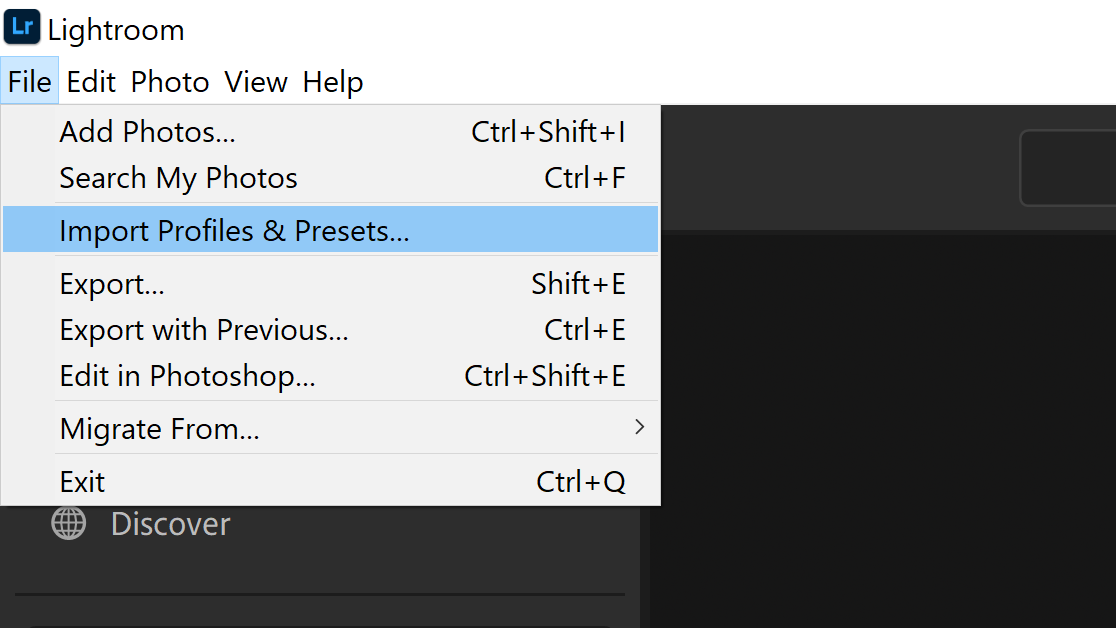
If you’re using Lightroom CC Desktop, you need to open an image and click on “File”. Scroll down to “Import Profiles & Presets…”
If you’re using Lightroom Classic, you will go to the Develop module. From there, click on “File” and scroll down to “Import Develop Profiles and Presets…”
Navigate to the file where your presets are located and click “import”.
Once you install new presets, you should be able to go to the “Presets” panel on the left side of your screen, select the one you’d like to use, and apply it to your photo.
Tip: If you don’t have a photo imported, when you click on the “Presets” arrow to show the presets, nothing will appear. You have to have a photo on deck in order to see the presets.
Lightroom 4, 5, 6 and Lightroom Classic 7.2 and older
Installing presets in earlier versions of Lightroom has a few more steps but is still pretty easy. Before you start, be sure you know where your Lightroom presets are saved. Here’s what to do next:
The first step will be downloading your Lightroom presets. They usually come in a compressed (zipped file). Unzip the file and save them on your computer. Open Adobe Lightroom.
In the Develop module, click on “File” (on Mac, use the “Lightroom” tab), then “Preferences”.
A new dialog box will appear with multiple tabs at the top. Click on the “Presets” tab.
Click the box “Show Lightroom Presets Folder”. Newer versions may say “Show All Other Lightroom Presets”.
Double click “Lightroom”.
Then, double click the “Develop Presets” folder.
Copy the files in the folder where you saved your downloaded presets and paste them into the “Develop Presets” folder. These will be .lrtemplate files.
Once you’ve copied the files into the “Develop Presets” folder, restart Lightroom.
To access your presets, click on “Presets” on the right side of your screen. A drop-down menu should appear with all of the presets listed.
How do I Install Presets on My Phone?
Installing Lightroom Presets on your mobile phone
First things first, you’ll have to unzip the files with your presets in them. You can do this on your computer and then upload the files to a cloud storage app that can be accessed by your phone
You can also download them directly onto your phone or tablet, just be sure to know where the files are located.
Open Lightroom Mobile.
Add your presets by clicking on the (…) Settings in the right corner.
Choose “Add Photos”.
Now, you will choose the location you’re going to pull your presets from. If they are located on your phone, pick “From Camera Roll”. If they are in the cloud, choose “From Files”
Choose the presets (DNG files) you’d like to import.
Tip: When you open these files, you may get an error message that says “Cannot Load File”. It’s okay, press the checkmark anyway.
Create presets from the DNG files you’ve just imported:
Click on the file and click on the three dots inside the circle in the upper right corner. Choose “Create Preset”.
Name the Preset. To keep things easy, I recommend using the name on the image.
Keep your presets in a Preset Group. Create a new group for each collection you obtain.
The Best Part?
This is the best part! You get to use the presets.
Presets usually come with an instruction file for specific instructions but generally, you just open a photo and click on the preset you’d like to run.
Have fun enjoying those new presets!