Does this sound familiar?
You’re scrolling through Instagram and you see photo after photo that look like they were taken by pros.
And you think to yourself:
Why can’t I take epic pictures like that to post on social media? Do all of my friends have some big secret I don’t know about? Did I miss out on the cheat code in life that gives me a professional photographer on hand at all times?
The answer is no, obviously.
The simple fact is you just haven’t mastered the ins and outs of iPhone 11 photography.
That is, assuming you have one…
If you are an iPhone 11 owner, or you’re about to take the plunge, then you have (or are about to have) an insane piece of tech wizardry in your pocket.
Don’t be afraid of it.
The camera functionality that this phone offers is insane, and with just a few easy tricks (11 to be precise), you’ll be punching out social media posts that will make you the envy of your whole squad.
Here’s how:
Master The iPhone 11 Photo Types
It’s been quite a few years since the smartphone camera was a simple one-trick pony. iPhones have had a wide range of functionality for generations now, and the new iPhone is all too happy to carry on that legacy.
How Can I Take Better Pictures With My iPhone 11?
Let’s take a look at the four different types of photos you can take with this phone, and more importantly, how you can use them to take next level images.
Standard Photos
By default, when you open the camera app, your iPhone will be set to ‘Photo’ mode.
This is the most elementary of the four different types, but it’s probably the one you’ll use the most.
Tip #1: Use Different Zoom Modes To Capture The Perfect Image
You’ll know by now that one of the biggest selling points of the new iPhone model is its new camera, or rather, cameras.
Here’s the deal:
The standard model comes with two lenses: the wide-angle lens (the regular one) and the ultra-wide lens.
The iPhone 11 Pro steps it up another notch by adding a third lens: the telephoto lens.
The two (or three) lenses are used in conjunction for functions like portrait mode (which we’ll get to soon), but they also enable you to access different zoom modes.
You’ll see when you have the app open that there is a little circle at the bottom with a 1x inside.
Tap it.
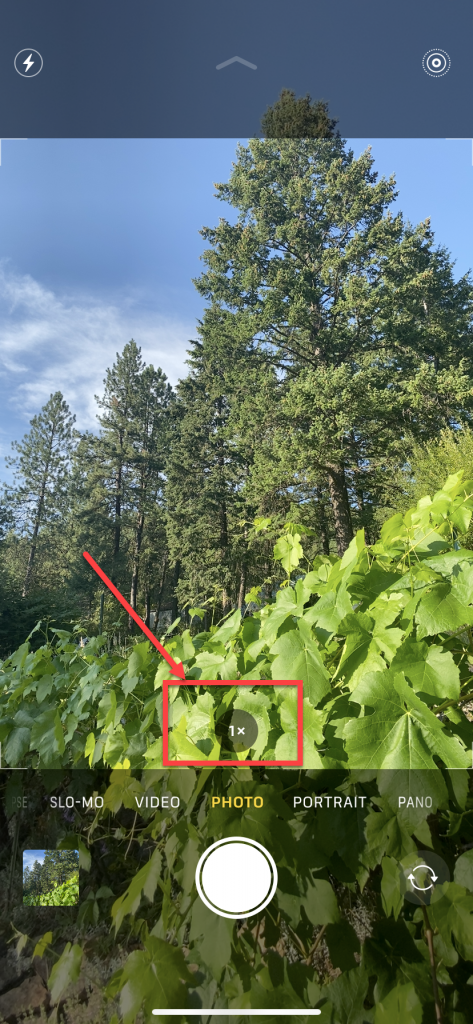
If you have the standard model, it will automatically switch to the ultra-wide lens, and the 1x will turn to 0.5x.
What you’ll see is the camera appears to zoom out, and it captures a whole lot more in one photo. This is perfect for things like
- flat lay photography,
- shooting landscapes,
- and fitting everyone into a big group photo.
On the iPhone 11 Pro, tapping this icon will bring up the option to switch to 0.5x, or 2x mode.
The 2x mode, as you probably guessed, zooms in 2x. The beauty is, this is optical zoom, which means your phone is using an entirely different lens, rather than simply digitally zooming in on the pixels of your photo.
The result?
Superior zoom, without any loss in picture quality.

Tip #2: Use The Wide Mode For Epic Selfies
I don’t care who you are, there’s about a 99.99999% chance you’ll be taking at least one selfie on your new iPhone.
One cool feature you can tap into when you’ve got the front-facing camera activated is to hit wide mode. This is fantastic when you’re trying to capture a photo in front of landmarks and large buildings.
If you’re traveling, you’ll definitely find you need to use the feature from time to time.
Turn your phone sideways (horizontal), and this will activate automatically, as your iPhone assumes you’re trying to fit more than one person in-frame.
Smart.
Quick Access Photography Tips
But wait, there’s more.
Apple has managed to pack a bunch of functionality into one-tap gestures, which saves you a tonne of time when you’re trying to get that perfect photo before you lose the shot.
Here are two more tips for functions you can use in Photo mode.
Tip #3: Hold Down The Shutter Button To Shoot Video
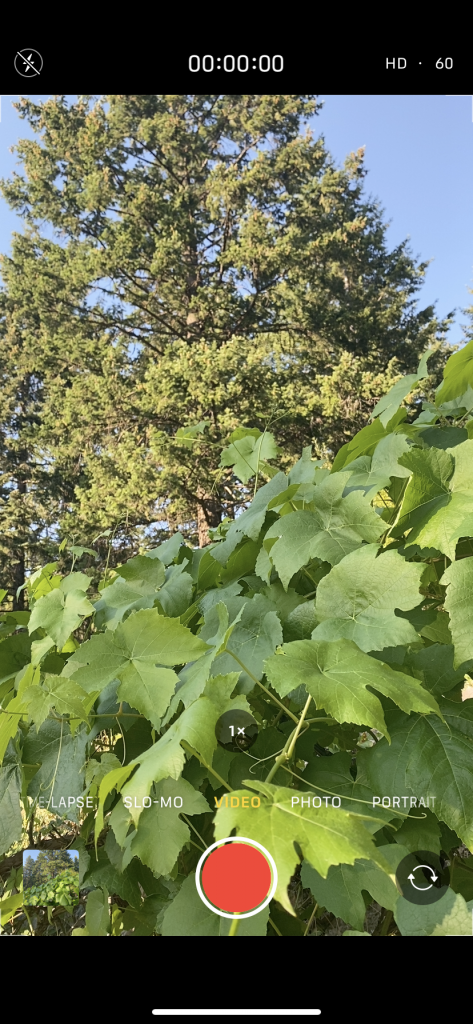
How many times have you pulled out your iPhone to take a video, but by the time you swipe over to Video mode, it’s just too late?
Thankfully, Apple has taken a leaf out of Snapchat’s book (which uses the same control gestures), and given you the ability to shoot video from the same mode.
There’s a catch though.
You can only shoot short videos, like those you’d put up on your Insta story.
It’s not all doom and gloom though. Want to record for longer?
Just swipe to the right while you’re holding down the shutter button!
Tip #4: Use Burst Mode To Get The Ultimate Frame
If you’ve been using an older model like the iPhone XS, you’re probably thinking:
“Hang on, isn’t that how you shoot in burst mode?”
The answer is, it was.
Now, if you want to shoot a photo in burst mode (take a bunch of photos in quick succession while you hold down the shutter), you’ll need to swipe left while holding it down.
Though I find this function doesn’t get used very often (which is probably why Apple shunned it in favor of a one-touch video function), it’s still pretty helpful for motion photography tasks, as it takes multiple photos and then you can go in and delete all the ones that were blurry.
Portrait Mode
When several generations ago Apple released the portrait mode function for the iPhone, people went nuts.
Suddenly, we had a one-tap way to transform basic photos into insane images with exceptional depth.
The new camera in the iPhone just makes this function even more incredible. I’ll admit, I use the portrait mode pretty much whenever I can.
The iPhone 11 steps it up a notch, and even gives you the ability to choose from six different lighting options:
- Natural
- Studio
- Contour
- Stage
- Stage mono
- High-key mono
These lighting styles are super helpful for capturing different feels and effects, and what’s more, they aren’t permanent. Once you’ve taken a picture in portrait mode, you can easily go back and select a different lighting type!
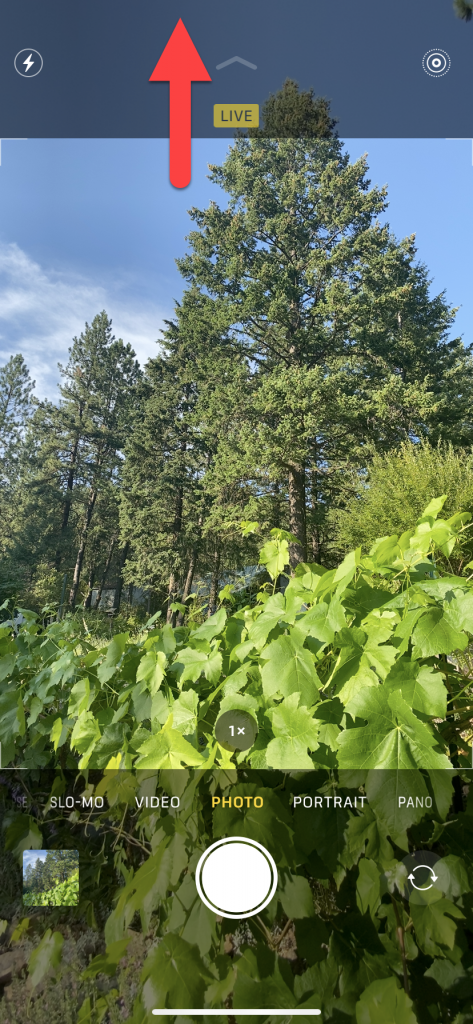
Tip #5: Tap The Arrow At The Top Of Your Screen To Edit Portrait Mode Settings
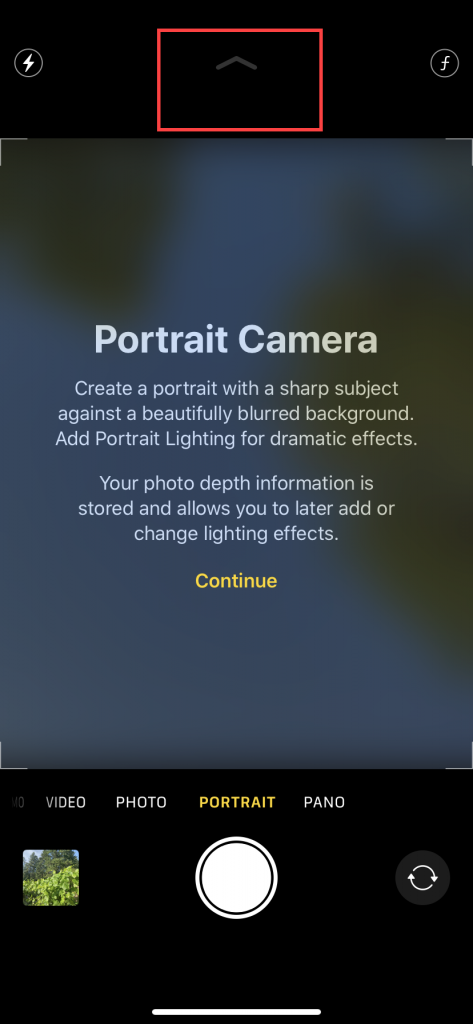
A little-known hack for taking professional photos on the new iPhone is to tap the arrow at the top of your screen to change your portrait mode settings.
With this simple hack, you can
- change the amount of light applied, (whatever light mode you’re in)
- and you can also adjust the amount of focus and blur in the background to nail the perfect photo.
Panorama
The third photo mode on the new iPhone is the panorama mode, which to be fair is more or less the same as the previous generations.
You can use this mode to take super wide photos – ideal for capturing outdoor backdrops and landscapes.
Live Photos
I’ll be honest, when this function first came out, I thought it was a bit of a gimmick.
I mean, how many times do you want a short 2-sec video? You either want a static photo, or a full-on video, right?
As a result, I didn’t really use it all that much.
Turns out, there’s a lot more to it than that with the new iPhone 11.
Editing Live Photos
To use the live photo mode, you’ll want to tap the Live icon at the top left of your screen.
Beware, once it’s on, it’s activated for every photo, until you turn it off again.
The reason I say beware is I’m sure I’m not the only one who’s taken multiple photos only to realize they were all in live mode…
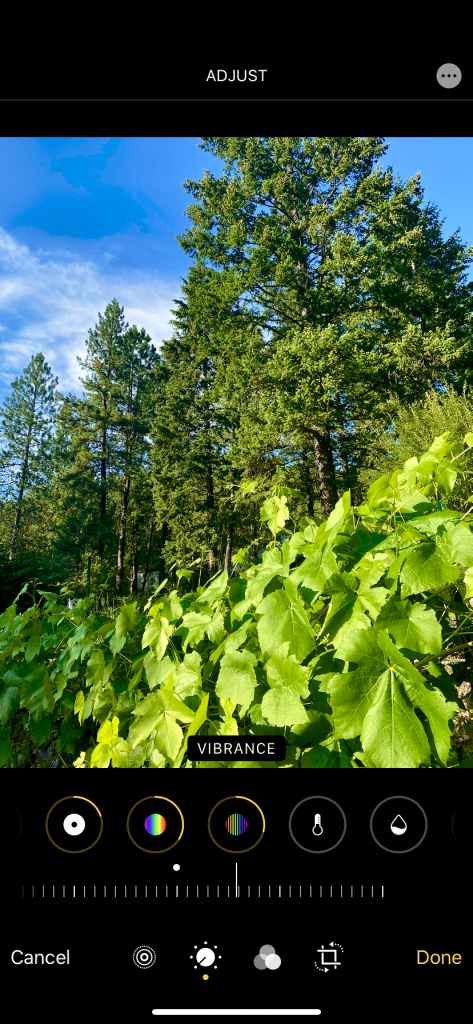
Tip #6: Swipe Up On A Live Photo To Access Some Cool Editing Features
Your live photo doesn’t just have to stay as what it was when you captured it. You can actually do some really sweet things in the editing suite inside the photos app:
- Loop – put the live photo on loop so that it constantly repeats
- Bounce – this is your ‘boomerang mode’
- Long exposure – your iPhone will turn the live photo into a static photo with a long exposure, which means you can do super cool stuff like long-exposure night-time photography, and use it for light painting
In addition, you can actually go through and change the key photo, which is what gets displayed as the static image. This is where the real power is in live pics.
By being able to pick the specific frame from a short video, you can get the perfect photo. Super helpful for taking group photos, as you can scrub through and find that one shot where nobody is blinking, laughing, or looking off into the distance like Jack Sparrow.
Sorry, Captain Jack Sparrow.
Make Use Of The iPhone 11 Camera Options
So, those are you four main photo modes on both the standard model and on the iPhone 11 Pro.
In any mode, you can dive a little deeper and access a few options, which give you even more flexibility and control on what your pics end up coming out like.
Tip #7: Tap The Arrow At The Top Of Your Screen To Access Camera Options
The options you have access to differ slightly for each mode, but for the most part, you’ll see:
- Flash – turn the flash on, off, or to auto mode
- Live mode – turn on or off
- Aspect ratios – 1:1 (square), 4:3, and 16:9
- Timer – fantastic for taking group shots when you want to get in there as well
- Filters – no need to wait for Instagram now, you can apply filters directly in the camera app
Get Your Focus Right First
There’s nothing worse than taking a photo you thought looked alright, only to later see that it was out of focus.
Though both the standard model and the 11 Pro are pretty good at automatically knowing what to focus in on, from time to time you’ll want to give them a helping hand.
Tip #8: Tap On The Screen To Focus
There are occasions where you have several different things in-frame, and you want the camera to focus on a specific subject, like your friend’s face.
When that’s the case, simply tap on the screen and your camera will automatically adjust its focus.
If you move though, sometimes it will readjust, in that case…
Tip #9: Tap And Hold To Lock Focus
To combat this issue, tap and hold on the screen to lock the focus from adjusting.
When you’ve done this, you can swipe up or down to adjust the amount of light that is being let in, which will also impact just how much the camera is focusing, or isn’t.
iPhone 11 Night Mode Photography Tips
Taking photos at night has always been a pain for smartphone photographers.
We just don’t have the flashy gear that professional photographers use to absolutely nail this technique.
Until now.
The night mode on the new iPhone 11 and iPhone 11 Pro is absolutely incredible, and you don’t even have to think about it.
Your phone will automatically detect when it’s in a low light situation, and turn night mode itself. You’ll know when this happens, as the night mode icon will appear at the top of your screen.
How does night mode work?
Night mode allows more light into the camera lens by slowing down the shutter speed.
Because of this, you’ll need to hold still for a bit while taking the photo.
Tip #10: Become A Night Light Bender By Use Night Modes Controls
If you really want to become a night mode ninja, you can even jump in and determine the amount of light that gets let in.
When the night mode icon is being displayed, tap it to use the night mode controls.

You can then slide left to right to adjust how much light is being let in on night mode. You’ll notice that at the top of the screen, the night mode icon will change, and let you know the shutter speed in seconds.
Feel like a professional photographer yet?
You will once you get out in the dark and use the night mode on your iPhone 11 or 11 Pro.
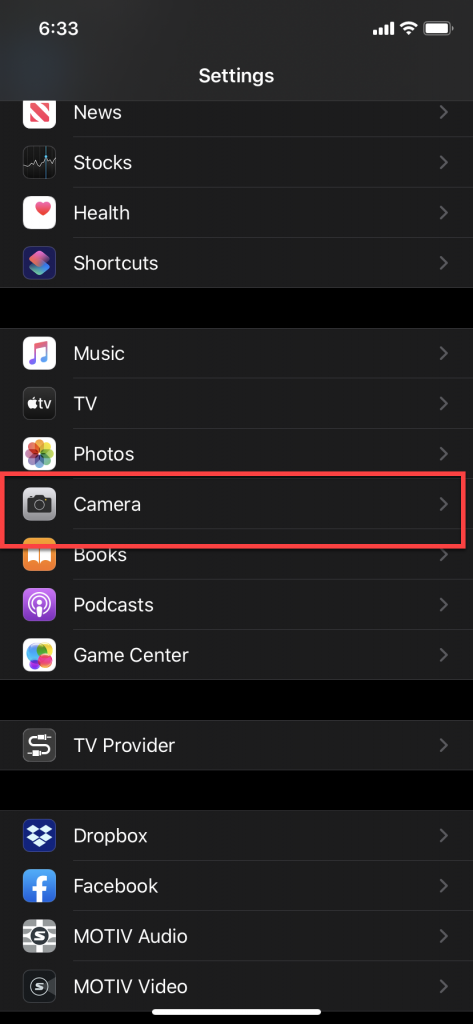
Tip #11 – Use Your Secret Weapon – iPhone 11 Camera Settings
Last but not least on our list of eleven top tips for epic photos on the iPhone 11 and iPhone 11 Pro is this:
Head into the settings app, and open up the camera settings.
You’ll notice a few things, and the first thing you should look at is the Preserve Settings feature.
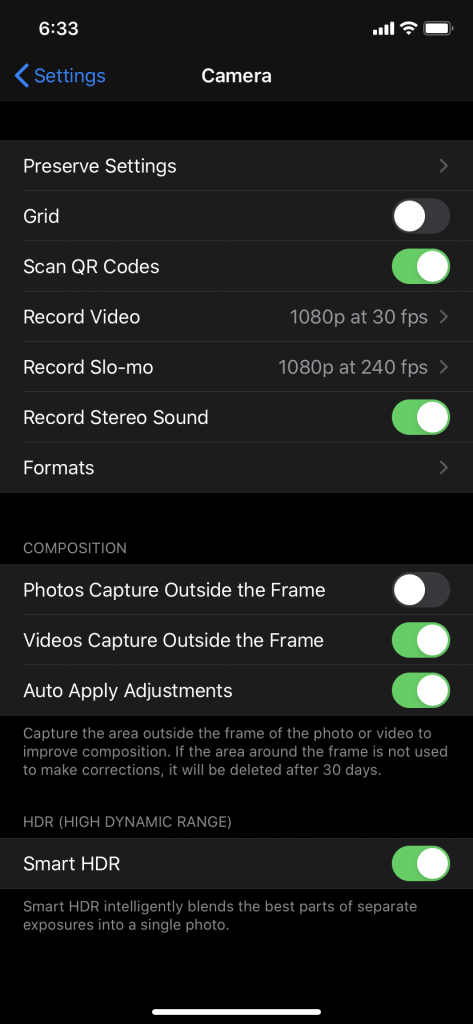
What this will do is make sure when you open up the camera, it will be set to how you used it last.
This is really helpful if you’re using the same kind of photo settings regularly, and it’s not the stock setting. Without activating this, the camera will automatically revert back to the default options.
The second thing you can do here is to activate grid mode, which as you’ll see when you return to the camera, puts a grid overlay on the screen.
This helps you frame your photos nicely, and is perfect for making sure you have faces front and center.
Thirdly, and this isn’t really a photography-related tip but it’s one I wanted to include anyway, play around with some of the different video settings.
I really like using the 60 FPS mode, as it feels a little more realistic and adds a bit of pizzazz to your vids. Of course, it does take up a bit more space on my iPhone 11 Pro, but what the hell. It looks great!
The iOS Photo Tech that Always Has Your Back
You might be wondering how Apple manages to capture such great looking photos almost every time.
The answer?
Deep Fusion.
Deep Fusion is essentially the next level of Smart HDR, and came out with iOS 13.2.
What Deep Fusion does is it takes a number of photos, and then blends them together.
It’s working always, and it’s even working before you hit the shutter button. That’s how smart Deep Fusion is. It takes 8 photos before you hit the shutter, 4 short images (close range), and 4 secondary images, and then when you hit the button Deep Fusion takes one further long exposure shot.
Then, the Neural Processor that Deep Fusion taps into analyzes every image, pixel by pixel, and creates one super high-quality image out of all of them, optimizing for focus, blur, detail, and noise.
Though in some cases you won’t really notice a difference between a regular shot and a Deep Fusion shot, in other areas it really shines, like when taking photos of your beloved pets.
Is iPhone 11 Good For Photography?
Can you be a photographer with an iPhone?
With the 11 Pro, you obviously stand a better chance of keeping up with the pros, but in either case, the answer is yes, with an asterisk.
Yes*
The reason is that the iPhone 11 and 11 Pro perform excellently under normal situations, but they won’t keep up with pro-level photographer equipment in certain situations, like capturing photos at gigs, or taking a picture of starry night.
I mean, the new night mode is pretty impressive, but it’s still far from what an expensive DSLR can do.
If you really want to get those epic photos you see on the social media channels of travel bloggers and influencers, you might need to turn to some pro-level gear.
Conclusion
There you have it, eleven top tips for taking photos on the iPhone 11.
Whether you’re hoping to capture some sweet selfies, go adventuring and try your hand at travel photography, or simply keen to take advantage of the phone’s excellent night mode feature, you’ll be pleasantly surprised at what the iPhone 11 can offer.
Now it’s time to get out there and put these tips into action.
If you’ve found these tips helpful and have taken an epic photo with them, let us know by posting it below!